 English
 Russian
 German
Rise of information capacity HDD (the Part II)
(Continuation)
Evgenie Rudometov, Victor Rudometov.
authors@rudometov.com
Compression in Windows NT 4.0
Before to pass to consideration of features of customisation of process of dynamic compression of the information, hranimoj on disks of files, it is necessary to make one remark. It is expedient to configure system so that at graphics mapping of a state of a disk space, compressed files were marked by alternative colour — dark blue. It will allow in the course of a visual inspection by means of appropriate software to distinguish compressed files from not compressed. With that end in view it is necessary to fulfil following operations:
- To open a window My Computer. For this purpose to click twice the left key of the mouse on an appropriate icon on the Desktop.
- From the menu Sort to select Parameters...
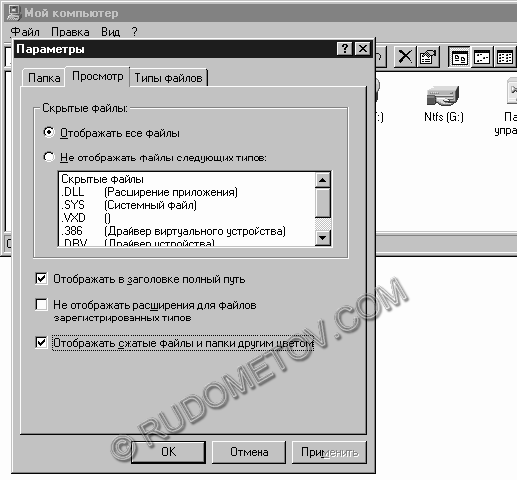
Fig. 9. To display compressed files and folders other colour.
- To press OK.
Now, for compression of some file (or groups of files) it is necessary to fulfil following operations:
- To open a folder where files are allocated, and to select those from them which are necessary for compressing.
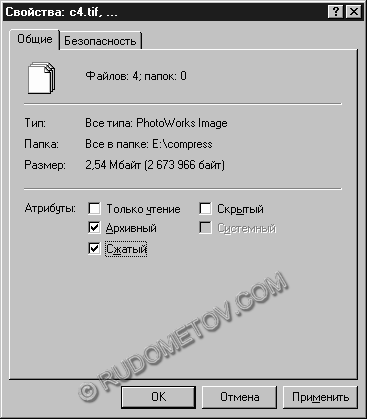
Fig. 10. Attribute installation Compressed.
- To press an OK button.
As a result of performance of the specified operations the selected files will be compressed. At a visual inspection by means of appropriate software they will be selected by dark blue colour.
Similarly it is possible to compress and a folder or even group of folders. This possibility is given after attribute installation Compressed and pressing OK. As a result of these operations the dialog box with the sentence will be output to compress all folders enclosed in the selected folder. If necessary it is necessary to mark the appropriate item (fig. 11) then to confirm a choice with pressing the keys OK.
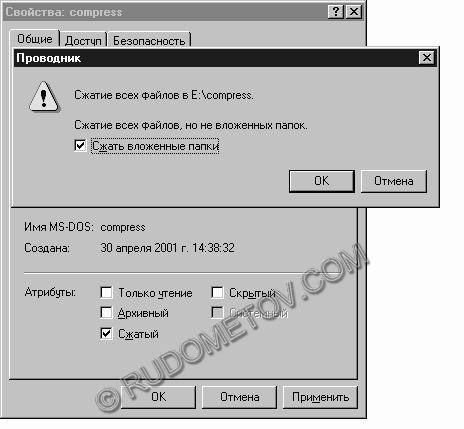
Fig. 11. The sentence to compress subfolders.
After pressing the key OK, confirming a choice of attributes, the window the file compression Course, showing the current information on file compression and folders will be output. Names of files and names of their folders containing, and also number of the compressed folders and files, size of data before compression and, at last, an aspect ratio (fig. 12) are thus output . By the way, at any moment compression process can be interrupted.
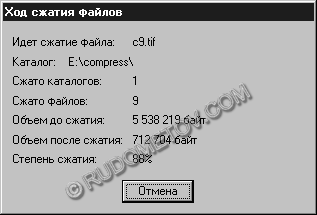
Fig. 12. A file compression course.
It is necessary to mark, that similarly it is possible to compress the whole section, having selected the item Compression in properties of section (fig. 13).
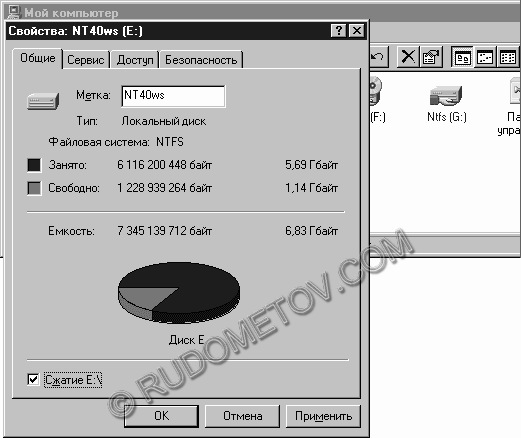
Fig. 13. Section compression.
To pass to razrelu Video and media